> ## Documentation Index
> Fetch the complete documentation index at: https://docs.dentolize.com/llms.txt
> Use this file to discover all available pages before exploring further.
# Starting the patient's treatment plan and issuing the invoice
> Use the dental chart: add planned and completed treatments to teeth, change their status, and invoice them.
Open the patient and click the **Chart** tab.
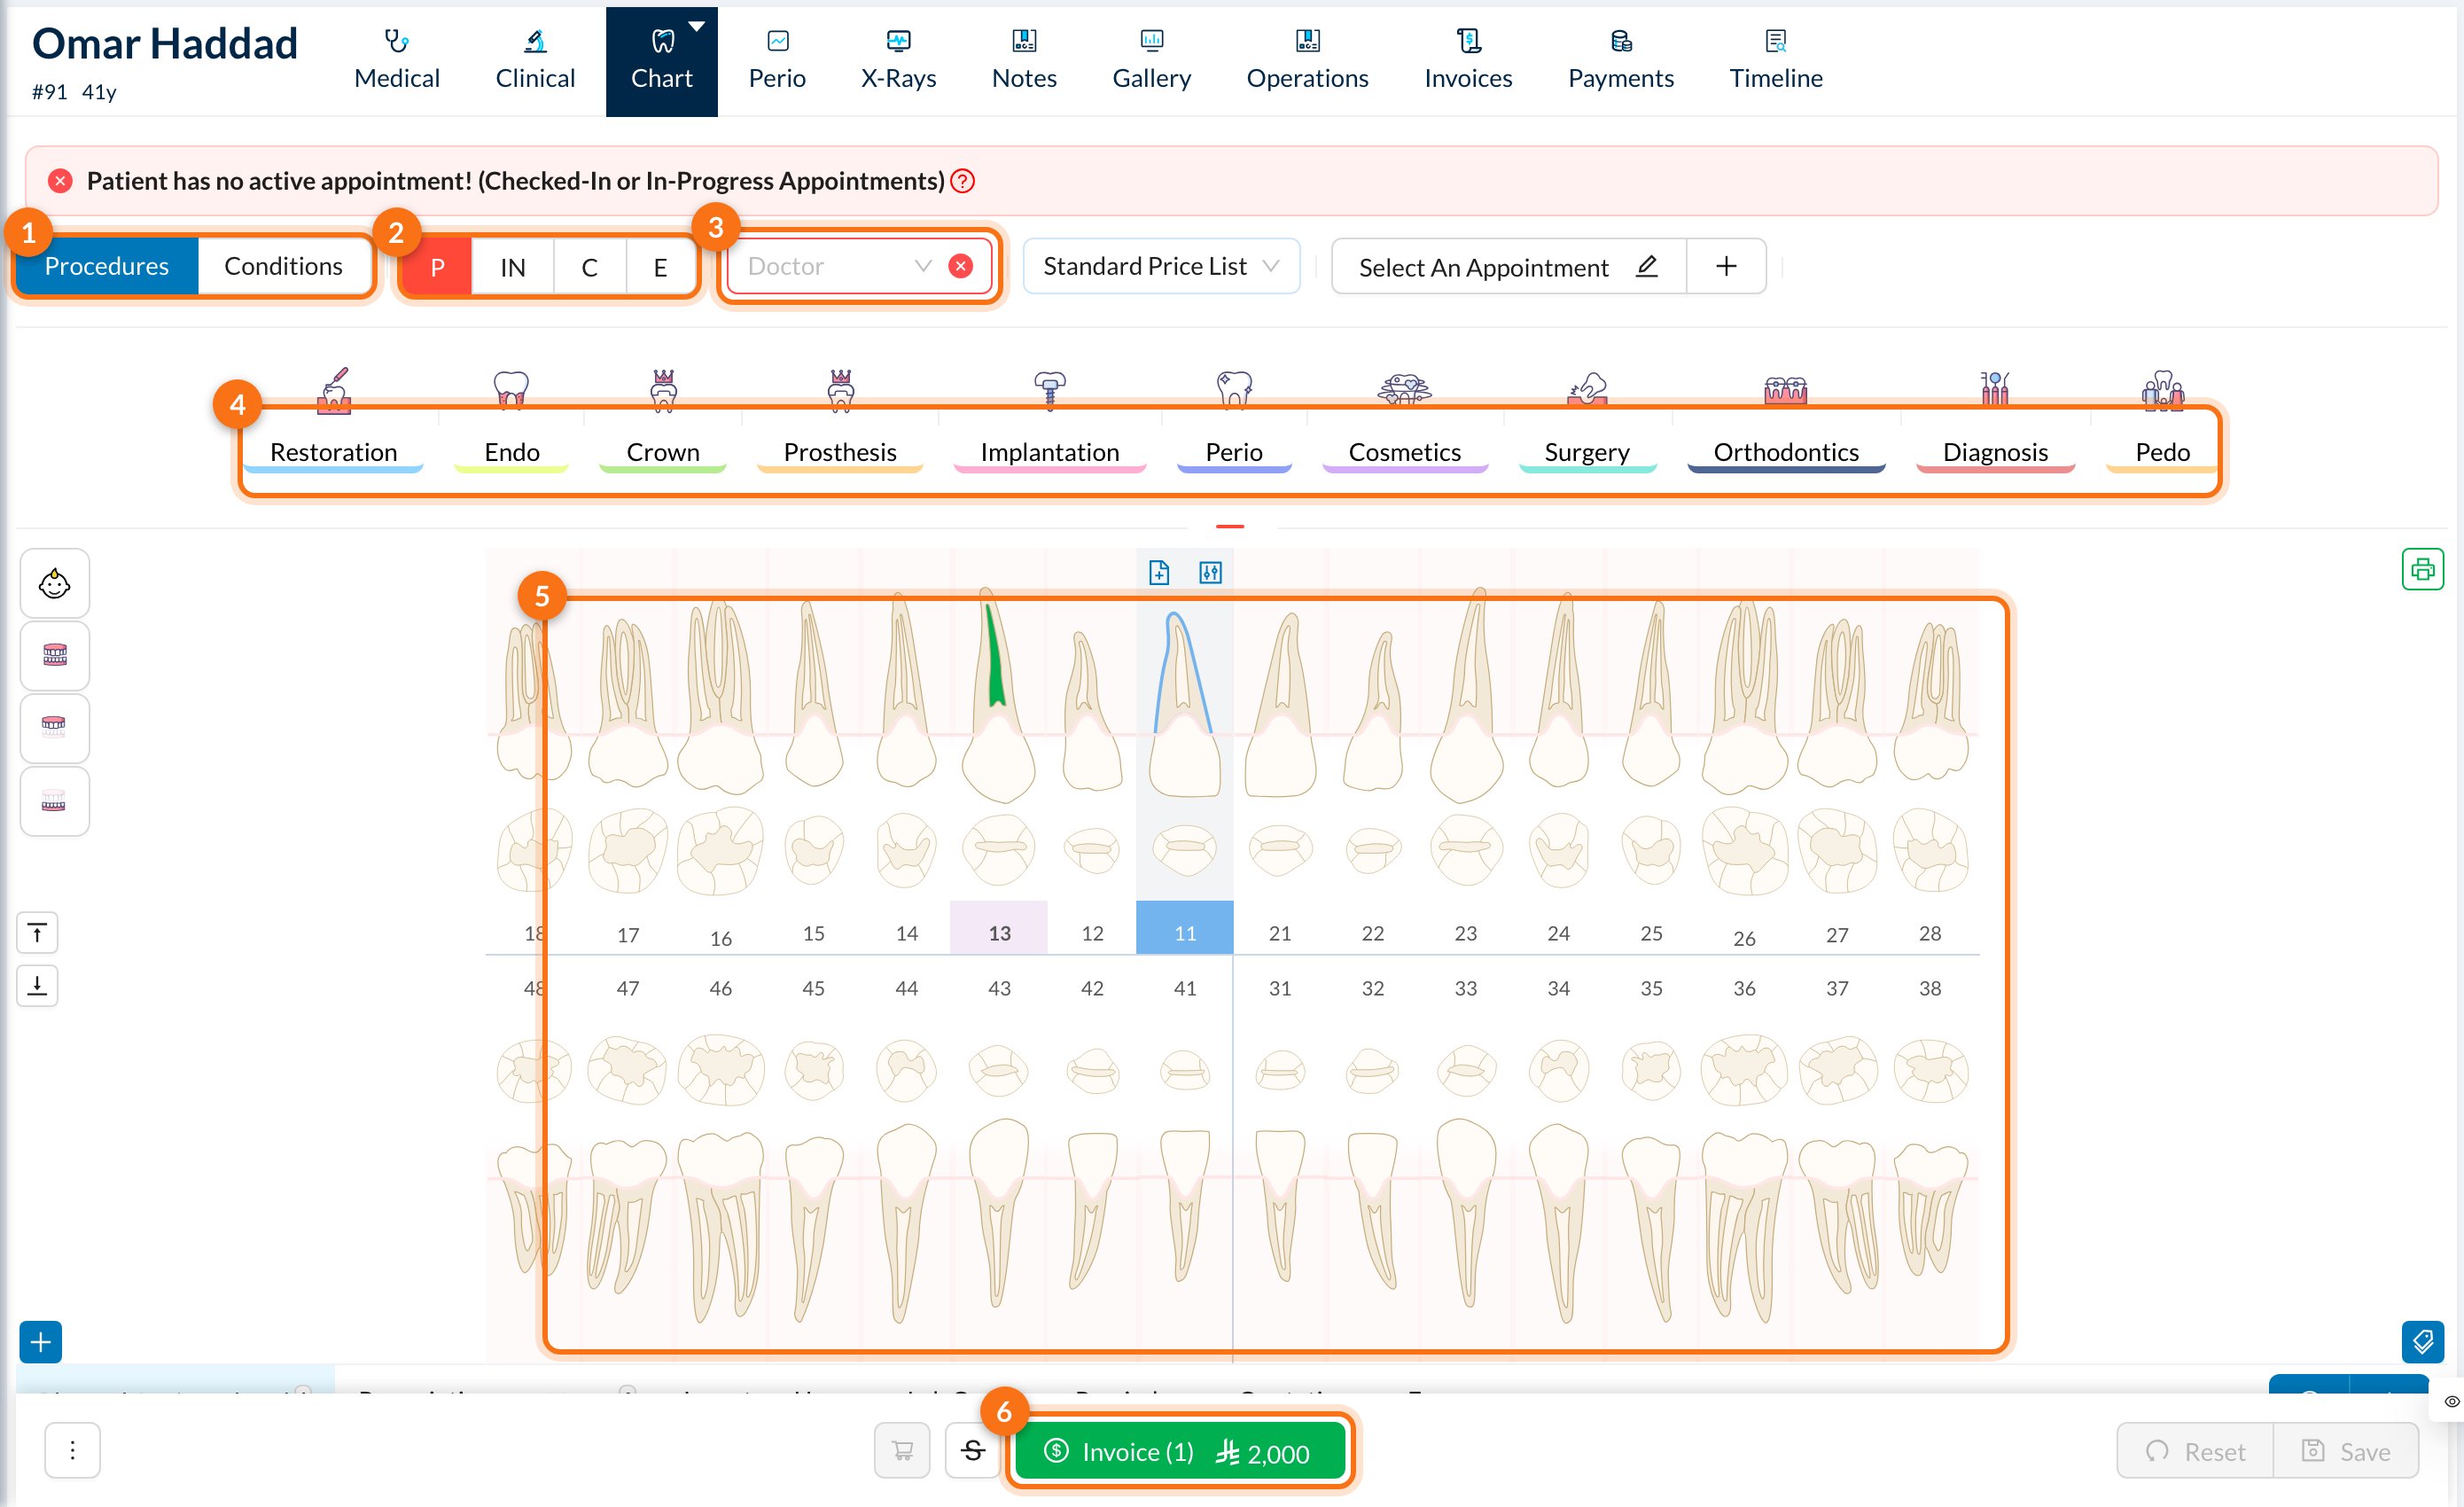 1. **Procedures** or **Conditions:** add treatments, or record conditions (diagnoses) at no price.
2. **Status** for new treatments: **P** Planned, **IN** In Progress, **C** Completed, **E** Existing (done before, elsewhere).
3. **Doctor:** the doctor for the treatments. Next to it are the **price list** and the linked **appointment**.
4. **Procedure groups:** Restoration, Endo, Crown and so on. Click a group to choose a procedure.
5. **Teeth:** click a tooth, a surface or a root. Drag across teeth to select several, or use the buttons on the left for the full mouth, upper or lower arch, or child teeth.
6. **Invoice:** invoice the selected treatments.
## ➕ Add a treatment
1. Choose the **status** (Planned by default) and check the **Doctor**.
2. Select the **teeth**, then pick the procedure from its group. The treatment is added straight away.
**One click adds a treatment, without confirmation.** If you choose the procedure first, every tooth you then click gets that treatment, until you click **Clear Selection**.
For more details (quantity, price, notes, or several treatments at once), click **+** → **Add Operations**.
## 🔄 Change a treatment's status
The treatments are listed under the chart. Click **P**, **IN**, **C**, **E** or **R** (Rejected) on a treatment to change its status.
1. **Procedures** or **Conditions:** add treatments, or record conditions (diagnoses) at no price.
2. **Status** for new treatments: **P** Planned, **IN** In Progress, **C** Completed, **E** Existing (done before, elsewhere).
3. **Doctor:** the doctor for the treatments. Next to it are the **price list** and the linked **appointment**.
4. **Procedure groups:** Restoration, Endo, Crown and so on. Click a group to choose a procedure.
5. **Teeth:** click a tooth, a surface or a root. Drag across teeth to select several, or use the buttons on the left for the full mouth, upper or lower arch, or child teeth.
6. **Invoice:** invoice the selected treatments.
## ➕ Add a treatment
1. Choose the **status** (Planned by default) and check the **Doctor**.
2. Select the **teeth**, then pick the procedure from its group. The treatment is added straight away.
**One click adds a treatment, without confirmation.** If you choose the procedure first, every tooth you then click gets that treatment, until you click **Clear Selection**.
For more details (quantity, price, notes, or several treatments at once), click **+** → **Add Operations**.
## 🔄 Change a treatment's status
The treatments are listed under the chart. Click **P**, **IN**, **C**, **E** or **R** (Rejected) on a treatment to change its status.
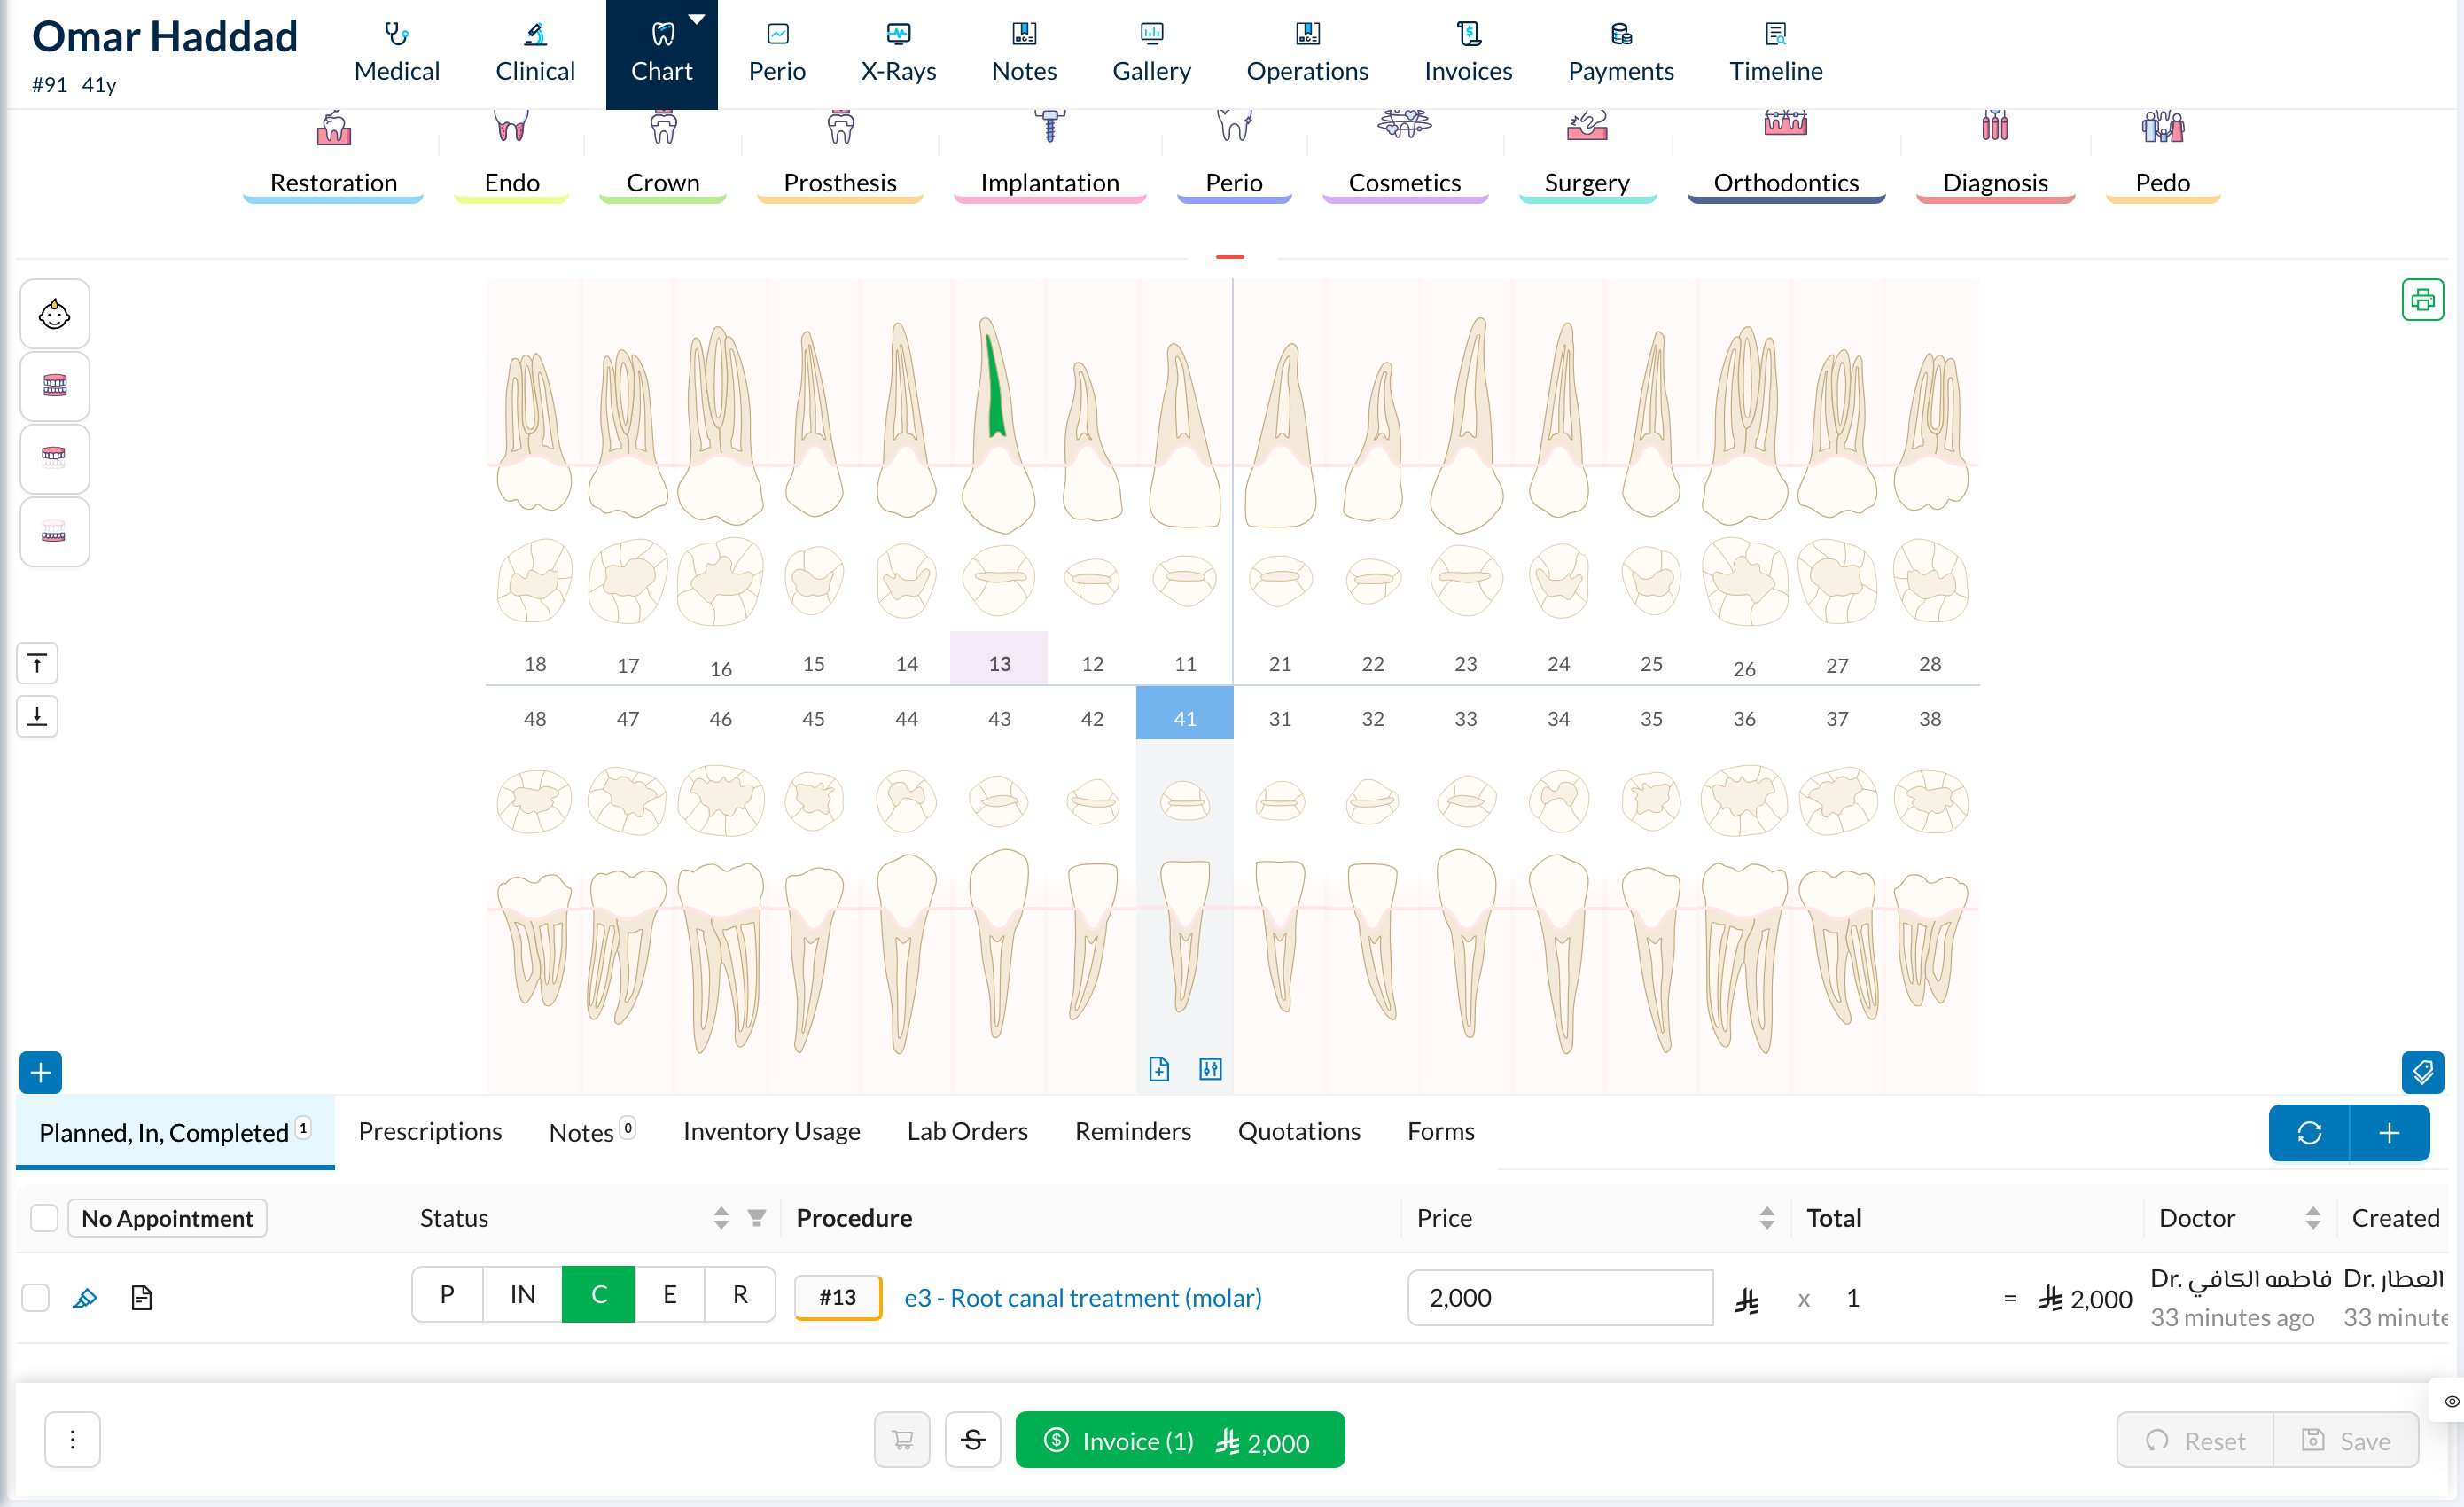 When a treatment becomes **In Progress** or **Completed**, Dentolize can automatically create its prescriptions, consent forms and lab orders. When it's **Completed**, it also calculates the doctor's share, creates the patient's follow-up reminders, and may open the **Usage** form for the materials used.
A procedure with a consent form that needs a signature can't be completed until the form is signed. Set it to **In Progress**, sign the form, then set it to **Completed**.
Moving a treatment back from **Completed** deletes its reminders and the doctor's share, but **not** the inventory usage. An invoiced treatment's status can't be changed back.
## 💵 Invoice
Tick the treatments to invoice, or none to invoice all ready ones, and click **Invoice** at the bottom. See [Collecting fees](/en/reception/fees-collections). If you edited prices in the list, click **Save and Invoice**.
The tabs under the chart also list the patient's **Prescriptions**, **Notes**, **Inventory Usage**, **Lab Orders**, **Reminders**, **Quotations** and **Forms**.
This documentation is built and hosted on [Mintlify](https://mintlify.com), a developer documentation platform.
When a treatment becomes **In Progress** or **Completed**, Dentolize can automatically create its prescriptions, consent forms and lab orders. When it's **Completed**, it also calculates the doctor's share, creates the patient's follow-up reminders, and may open the **Usage** form for the materials used.
A procedure with a consent form that needs a signature can't be completed until the form is signed. Set it to **In Progress**, sign the form, then set it to **Completed**.
Moving a treatment back from **Completed** deletes its reminders and the doctor's share, but **not** the inventory usage. An invoiced treatment's status can't be changed back.
## 💵 Invoice
Tick the treatments to invoice, or none to invoice all ready ones, and click **Invoice** at the bottom. See [Collecting fees](/en/reception/fees-collections). If you edited prices in the list, click **Save and Invoice**.
The tabs under the chart also list the patient's **Prescriptions**, **Notes**, **Inventory Usage**, **Lab Orders**, **Reminders**, **Quotations** and **Forms**.
This documentation is built and hosted on [Mintlify](https://mintlify.com), a developer documentation platform.