> ## Documentation Index
> Fetch the complete documentation index at: https://docs.dentolize.com/llms.txt
> Use this file to discover all available pages before exploring further.
# Expenses
> Record the clinic's expenses, pay them in full or in parts, and follow up what is still unpaid.
An expense is something the clinic has to pay, like rent, lab work or supplies. It can be paid right away, or later in one or more **expense payments**.
## 📋 The expenses list
Go to **Finances → Expenses**:
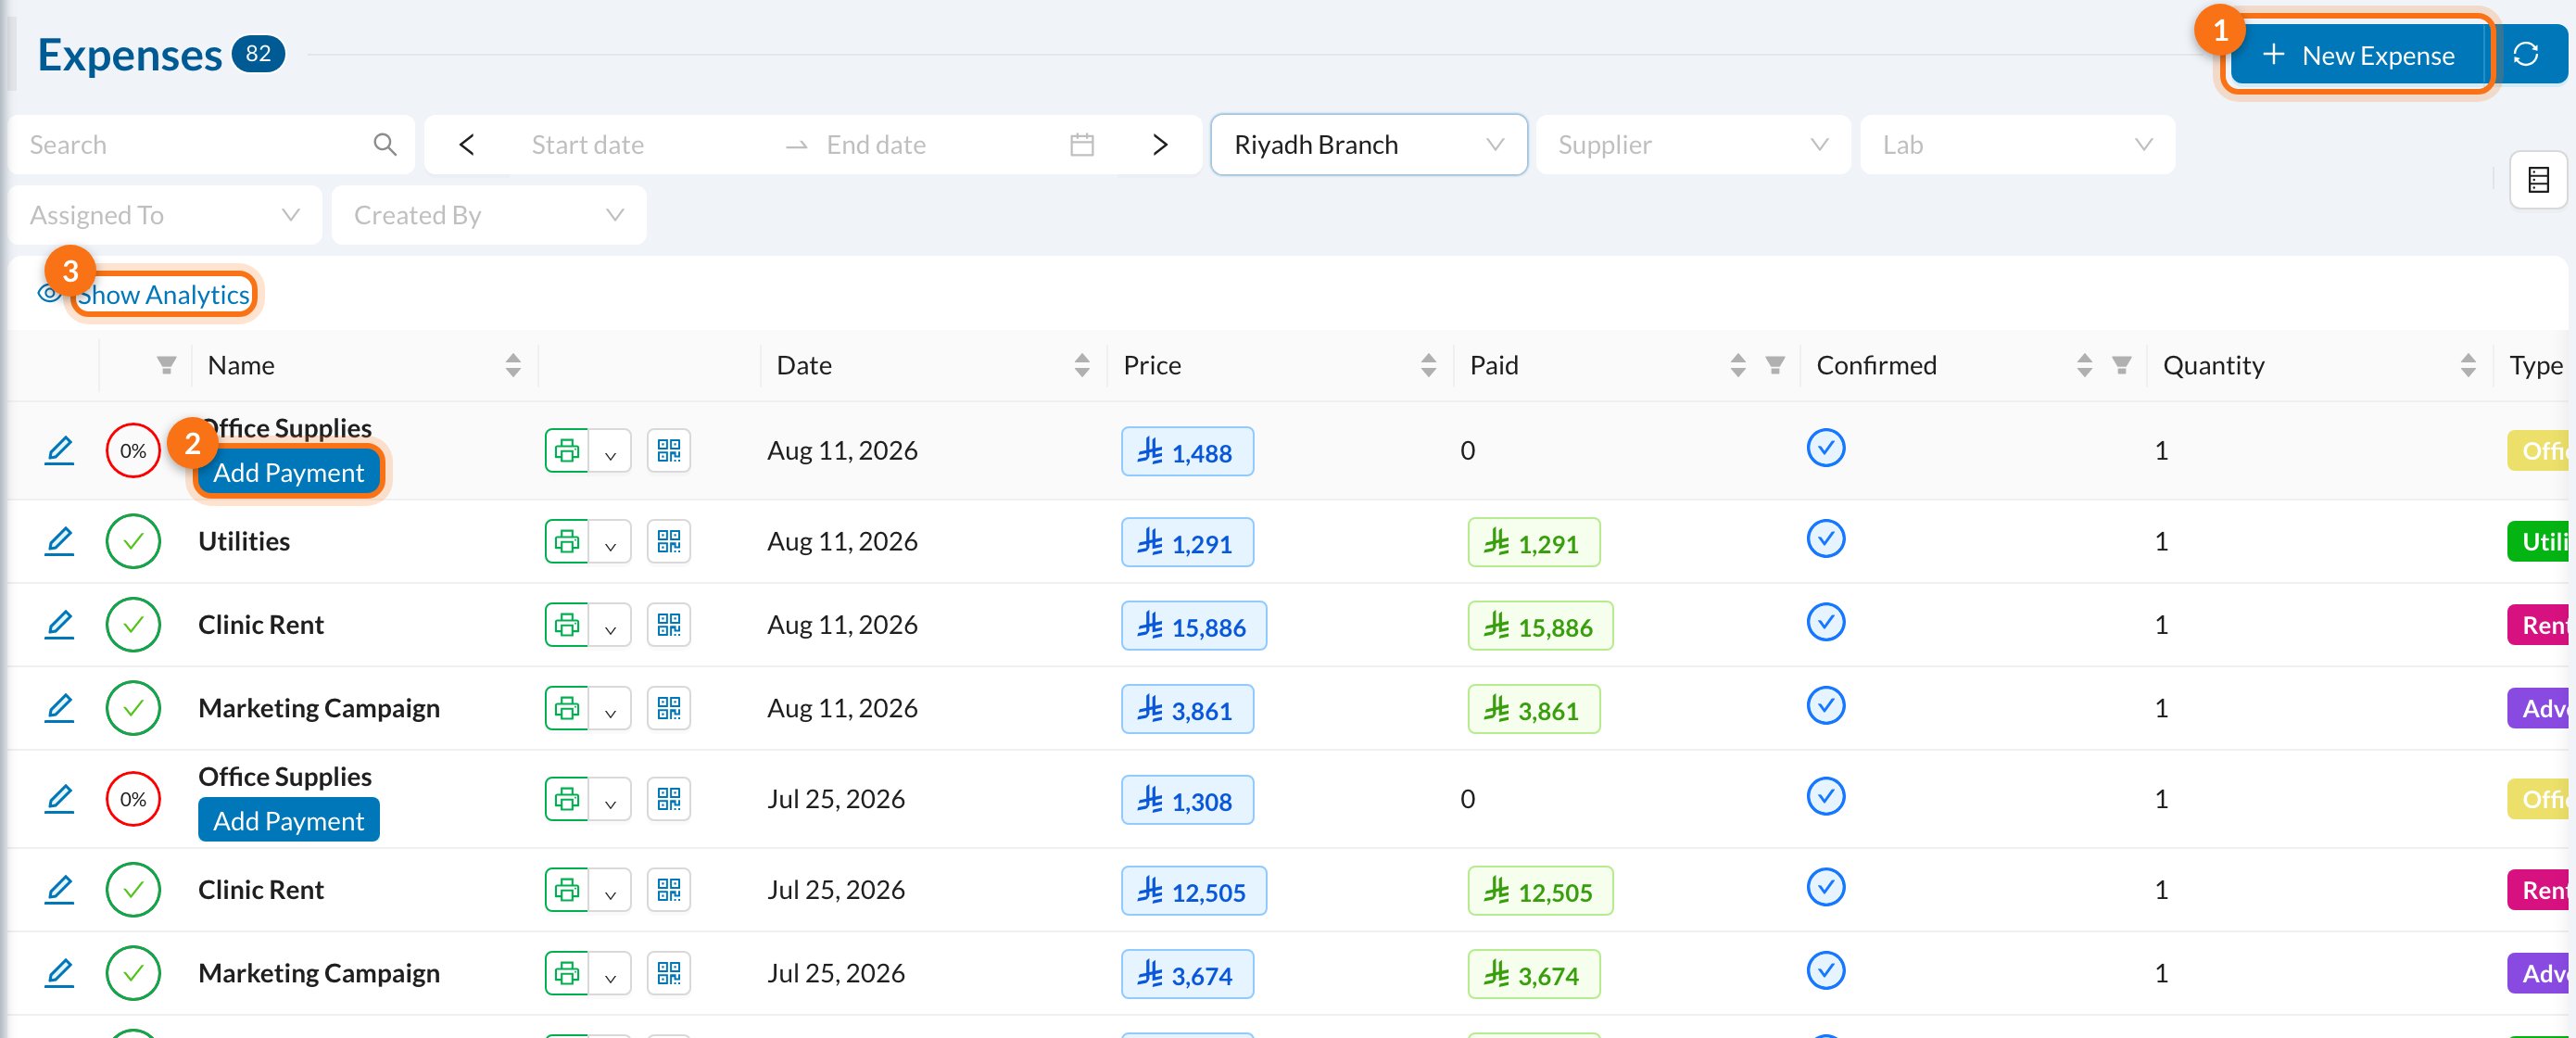 1. **New Expense.**
2. **Add Payment:** shown on expenses that aren't fully paid. The ring shows how much is paid.
3. **Show Analytics:** the total, paid and remaining amounts for each expense type.
Filter by date, branch, supplier, lab or user. The **Confirmed** column shows whether the goods or service were received: click it to confirm.
## ➕ Add an expense
Click **New Expense**:
1. **New Expense.**
2. **Add Payment:** shown on expenses that aren't fully paid. The ring shows how much is paid.
3. **Show Analytics:** the total, paid and remaining amounts for each expense type.
Filter by date, branch, supplier, lab or user. The **Confirmed** column shows whether the goods or service were received: click it to confirm.
## ➕ Add an expense
Click **New Expense**:
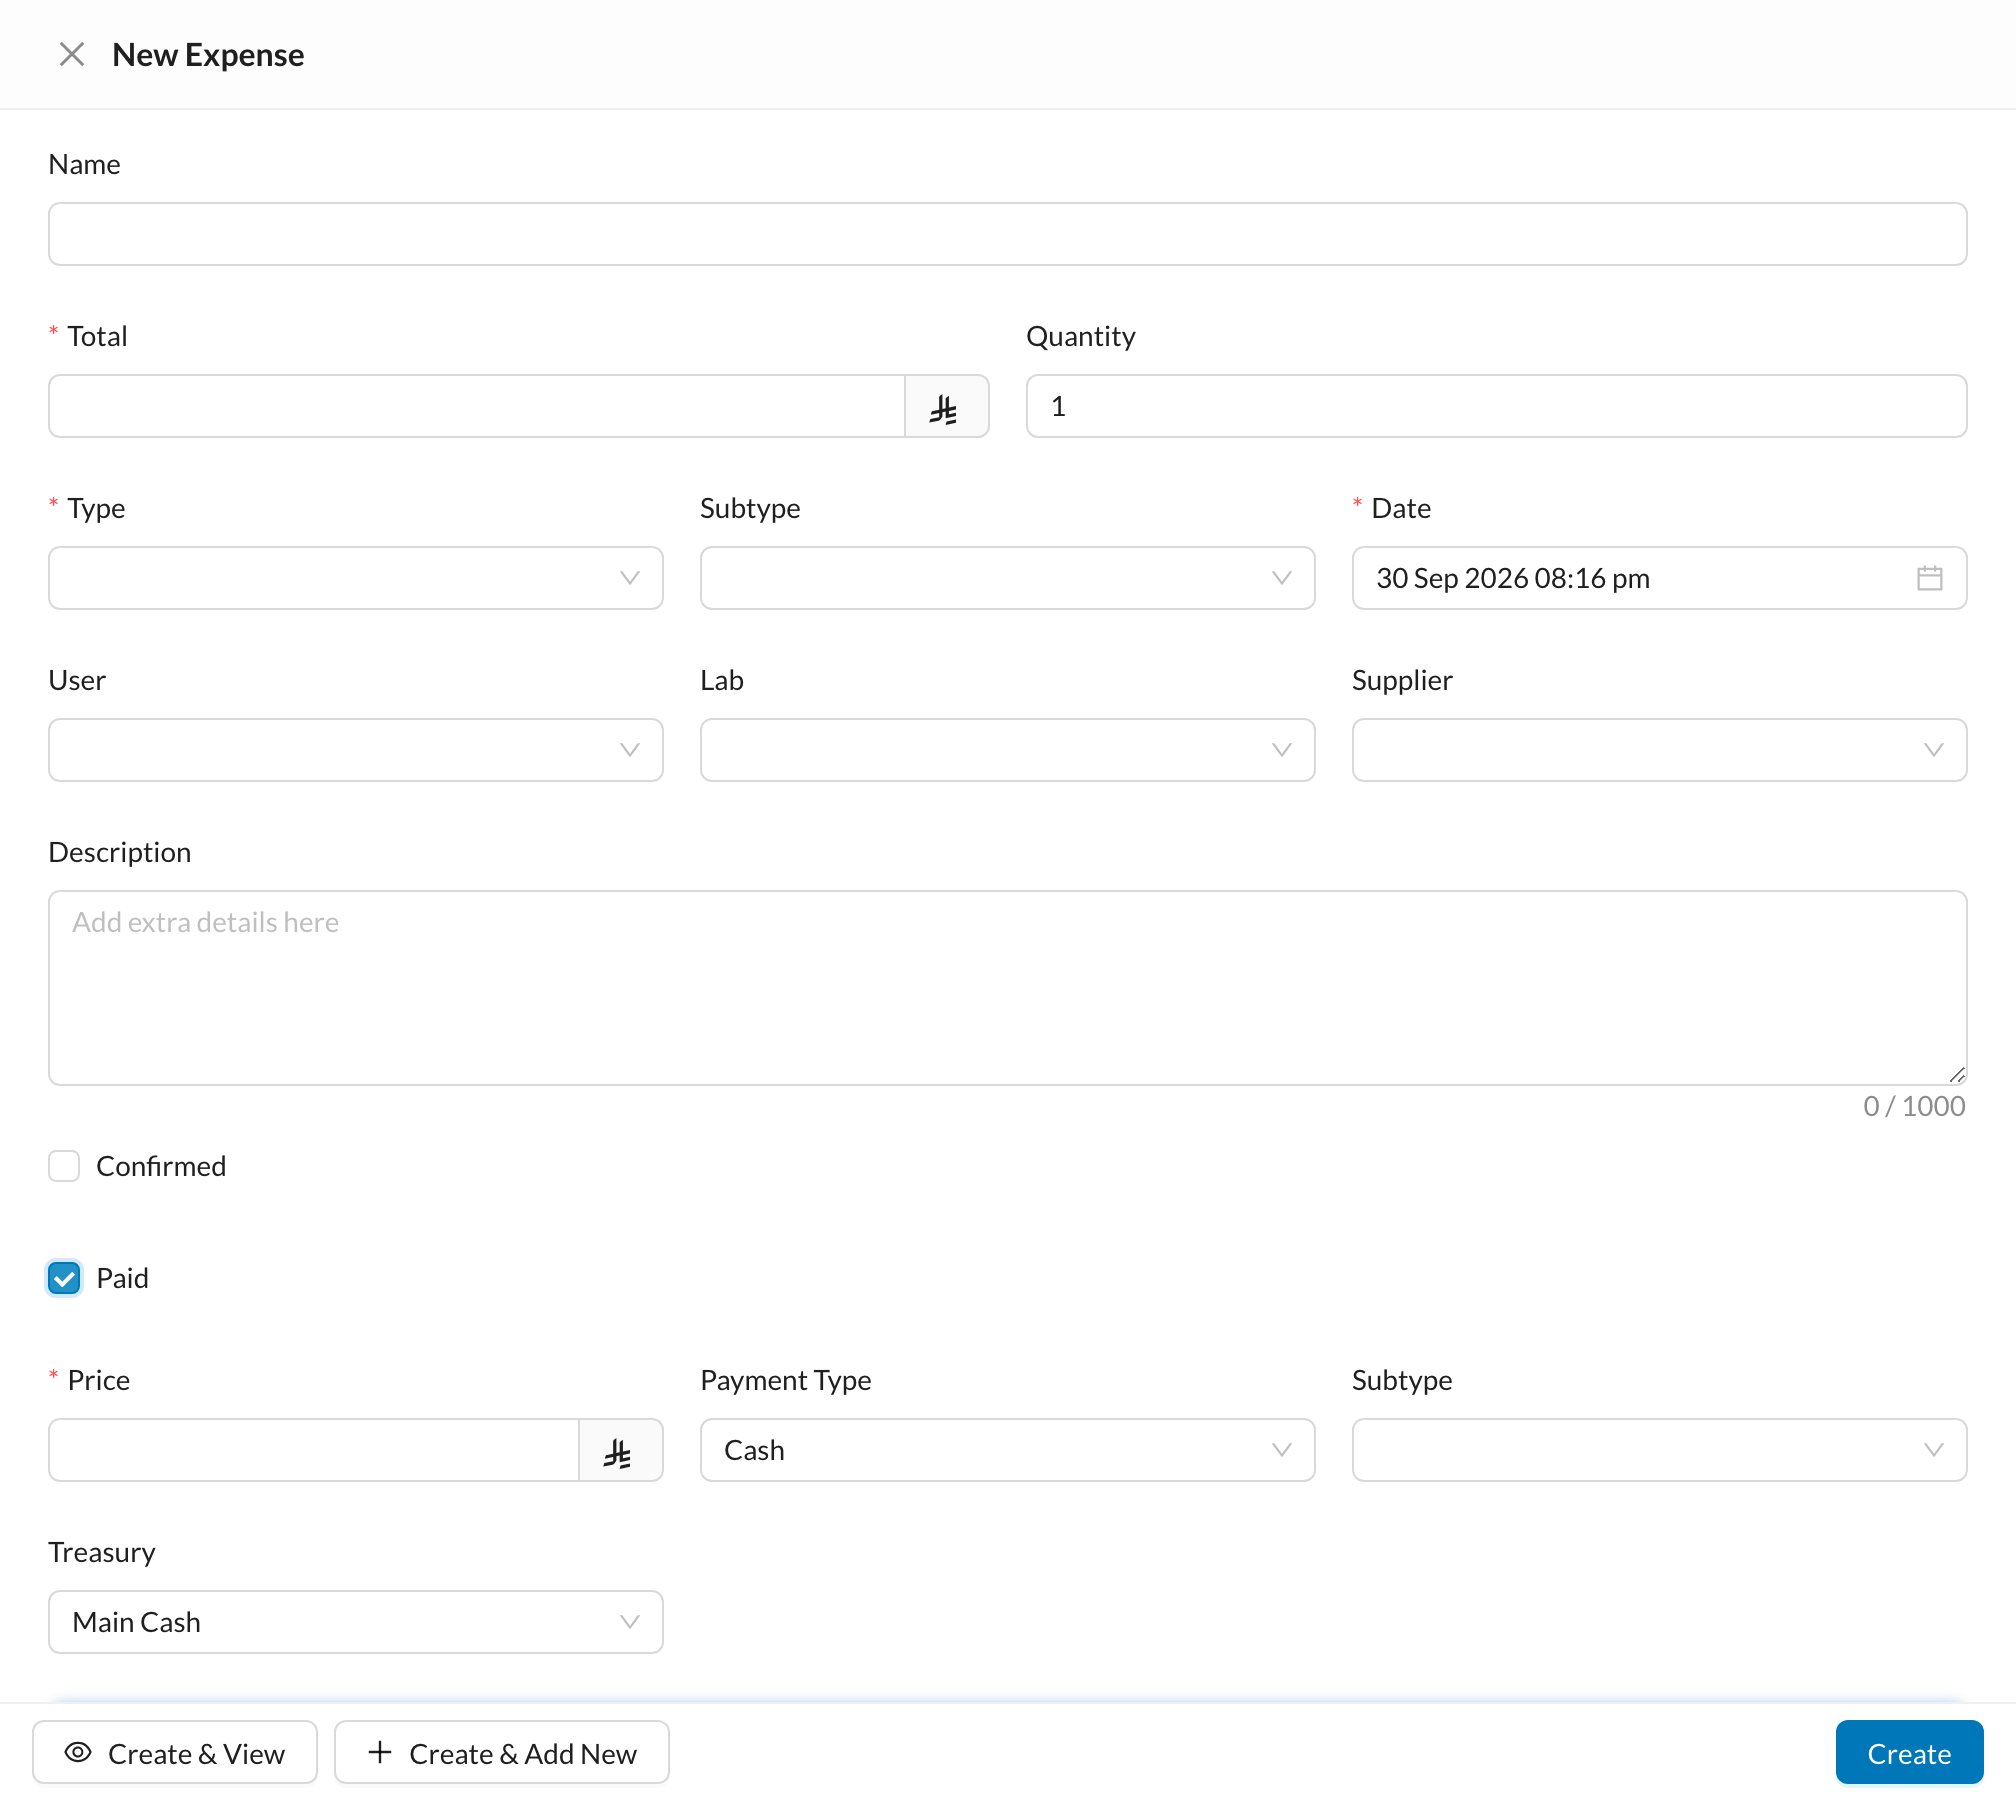 Enter a **Name**, the **Total** and the **Quantity**, and choose the **Type** (the types are set in [Clinic → Types](/en/setup-settings/basic-branch-settings)). The **Date** can't be in the future.
Link the expense to a **User** (for example, for salaries), a **Lab** or a **Supplier**, so it shows on their accounts.
Tick **Paid** if you're paying now. Enter the amount paid (**Price**), the **Payment Type** and the **Treasury** the money comes out of.
Click **Create**. **Create & View** opens the expense afterwards, and **Create & Add New** clears the form for the next one.
For a salary expense you can tick **Deduct From Next Automatic Salary**: the amount is taken off the user's next automatic salary (for example, an advance). Recurring expenses like rent can be created every month automatically, see [Monthly expenses](/en/setup-settings/process/monthly-exp-settings).
## 💸 Pay an expense
Click **Add Payment** on an unpaid expense:
Enter a **Name**, the **Total** and the **Quantity**, and choose the **Type** (the types are set in [Clinic → Types](/en/setup-settings/basic-branch-settings)). The **Date** can't be in the future.
Link the expense to a **User** (for example, for salaries), a **Lab** or a **Supplier**, so it shows on their accounts.
Tick **Paid** if you're paying now. Enter the amount paid (**Price**), the **Payment Type** and the **Treasury** the money comes out of.
Click **Create**. **Create & View** opens the expense afterwards, and **Create & Add New** clears the form for the next one.
For a salary expense you can tick **Deduct From Next Automatic Salary**: the amount is taken off the user's next automatic salary (for example, an advance). Recurring expenses like rent can be created every month automatically, see [Monthly expenses](/en/setup-settings/process/monthly-exp-settings).
## 💸 Pay an expense
Click **Add Payment** on an unpaid expense:
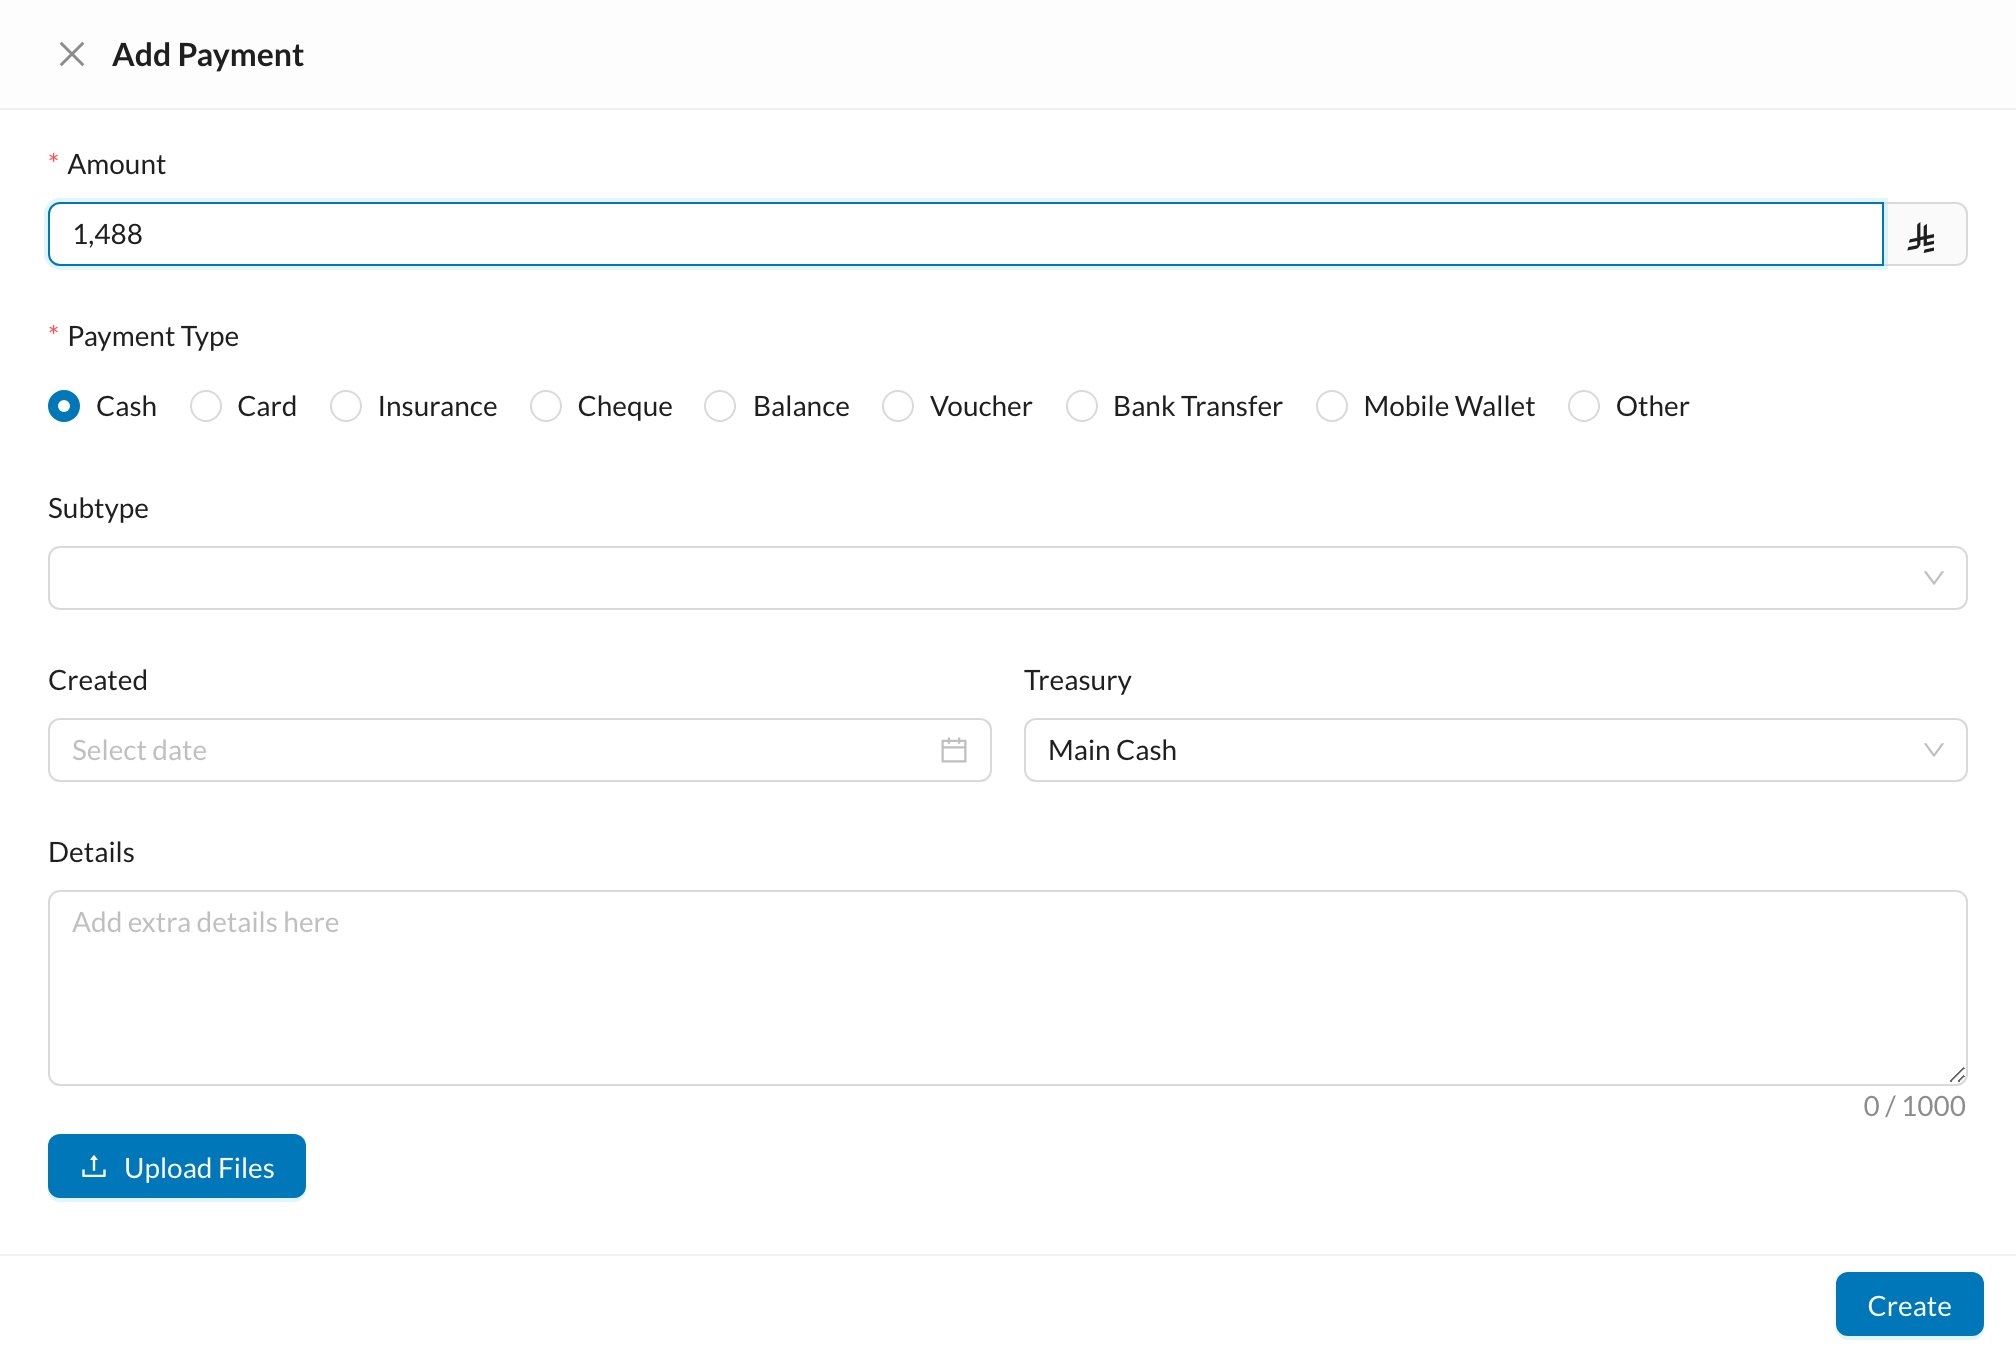 Enter the **Amount** (up to what's left to pay), the **Payment Type** and the **Treasury**, and click **Create**. The amount is taken out of the treasury.
To pay many expenses at once, filter the list (for example by supplier) and click **Add Bulk Payment** at the bottom. The amount is spread over the unpaid expenses, oldest first.
## 🧾 Expense payments
**Finances → Expense Payments** lists every payment made for expenses:
Enter the **Amount** (up to what's left to pay), the **Payment Type** and the **Treasury**, and click **Create**. The amount is taken out of the treasury.
To pay many expenses at once, filter the list (for example by supplier) and click **Add Bulk Payment** at the bottom. The amount is spread over the unpaid expenses, oldest first.
## 🧾 Expense payments
**Finances → Expense Payments** lists every payment made for expenses:
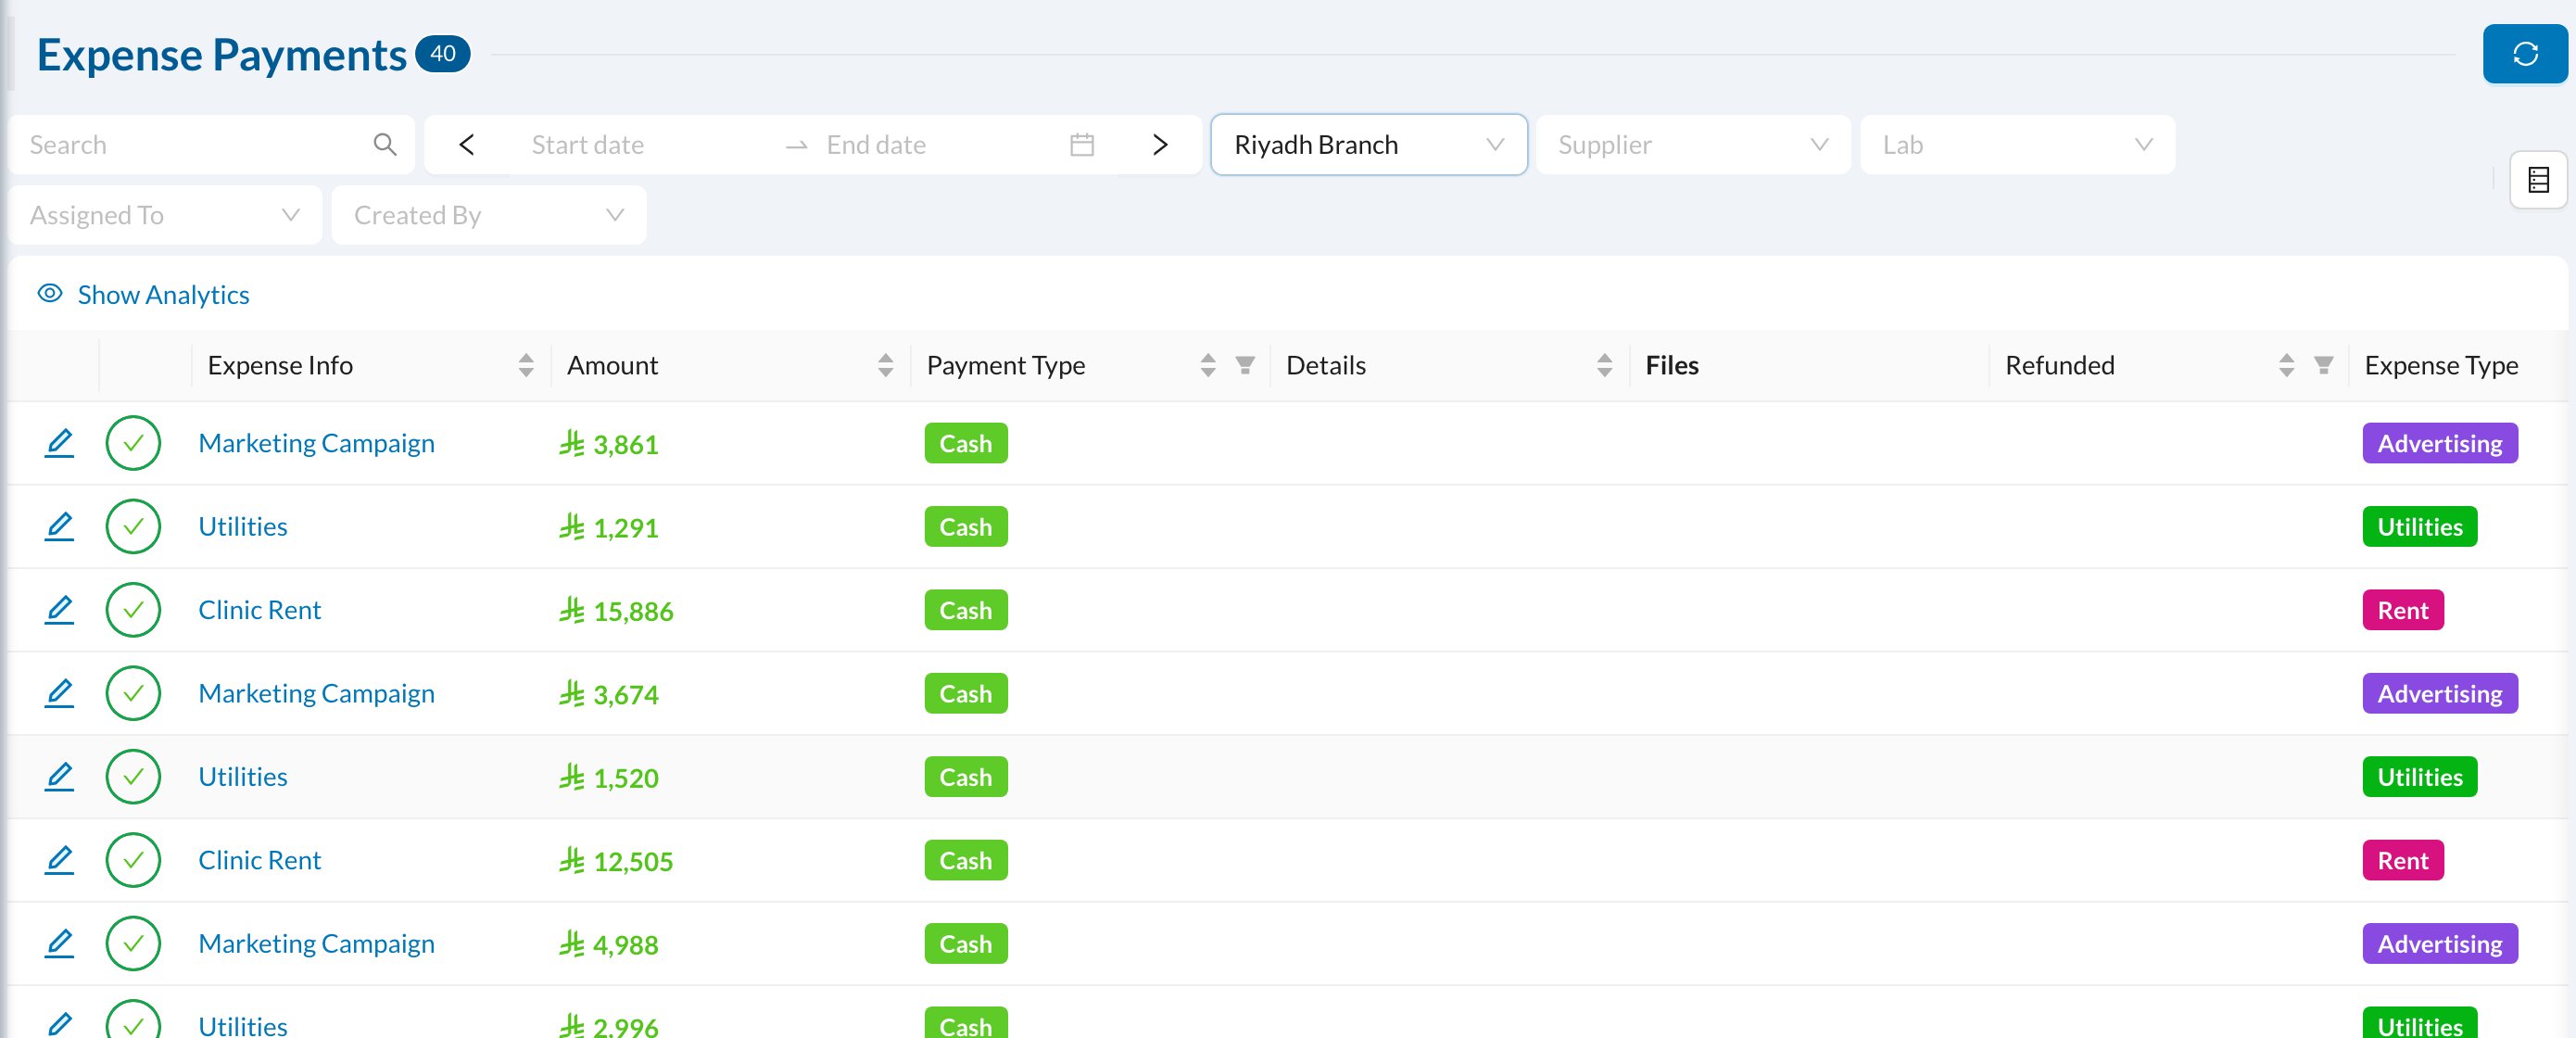 Click the edit icon to change a payment's details or to **Refund** it (for example, when a supplier returns money). A refund adds the money back to the treasury and creates an income.
An expense with payments can't be deleted. Delete its payments first.
See also [Add Expenses](/en/reception/add-expenses) for the quick steps at the front desk.
Click the edit icon to change a payment's details or to **Refund** it (for example, when a supplier returns money). A refund adds the money back to the treasury and creates an income.
An expense with payments can't be deleted. Delete its payments first.
See also [Add Expenses](/en/reception/add-expenses) for the quick steps at the front desk.